My profile photo looked fine to me until a friend zoomed in on it during a call and said “yaar, your beard looks patchy in photos — it doesn’t look like this in person.” That comment sent me down three weeks of testing every AI beard enhancement tool I could find.
Here’s the thing about beards in photos: camera sensors and most phone cameras genuinely struggle with fine hair texture, especially in anything less than ideal lighting. The individual hairs that give a beard its density and definition get compressed into a blurry mass — and what looks full and groomed in real life ends up looking patchy or uneven in photos.
It’s not your beard. It’s the camera’s limitations with fine hair detail. And in 2026, AI tools have gotten good enough at reconstructing that texture that the difference between a camera-flattened beard photo and an AI-enhanced one is genuinely significant.
I tested this thoroughly after that comment from my friend — both for my own photos and then for a few others who had the same problem. Here’s what works and what produces unnatural-looking results that are actually worse than the original.
Why Beards Look Worse in Photos Than in Real Life
Understanding the problem helps you choose the right fix. Phone cameras use computational photography — they process images heavily after capture, applying sharpening, noise reduction, and HDR merging. These processes are tuned for skin, backgrounds, and general scenes. They’re not tuned for fine hair texture.
The noise reduction stage is usually the biggest culprit. Hair is high-frequency detail — lots of rapid changes between dark and light pixels. Noise reduction algorithms can’t always distinguish between photo noise and actual fine hair detail, so they smooth both out. Your beard loses definition even if the overall photo is technically sharp.
Add to this that beards photograph differently depending on skin tone contrast, lighting angle, and the specific color of the beard hair. A dark beard on pale skin photographs cleanly. A medium-brown beard on medium skin with flat overhead lighting can lose significant definition. And patchy areas that are barely noticeable in natural light become obvious under the flattening effect of a camera flash.
Before reaching for AI tools, the single most impactful thing you can do is fix the lighting. Side lighting — a window to your left or right rather than directly in front or above — creates shadow in the contours of your beard and makes individual hair groups much more visible. Photos taken in flat overhead light or direct flash will always compress beard texture, regardless of what AI you apply afterward.
The AI Tools That Actually Work for Beards

Remini’s face enhancement AI handles hair texture — both head hair and facial hair — better than most general-purpose photo enhancers because it was specifically trained on portrait photos with detailed human features. Upload a photo where your beard looks flat or patchy and the AI adds micro-texture — individual hair-group definition, edge sharpness along the beard line, depth in the hair mass. The results are consistently natural-looking rather than over-processed. The free tier gives you a limited number of enhances per day. For a single profile photo or a batch of portraits, this is the first tool I’d try.
This approach is more involved but gives the most control over the final result. You upload your photo as a reference image and combine it with a detailed prompt describing the beard enhancement you want. Midjourney then generates a portrait that incorporates your reference image’s face and features but with the described beard characteristics — sharper definition, filled-in patches, more consistent texture. The key is writing precise prompts (more on this below). The output is a generated image, not a filtered version of your original — which means it works best for social media use rather than official documents.
Adobe Firefly’s Generative Fill is the most surgical approach — you can literally brush over patchy areas of a beard in your photo and describe what you want Firefly to generate there. “Fill with short dense beard hair matching the surrounding texture” consistently produces surprisingly natural-looking results on areas where the beard is uneven or sparse in the photo. The control is unmatched — you’re targeting specific problem areas rather than processing the whole image. Firefly also handles color matching well, so the filled areas blend with the existing beard rather than looking like a different shade or texture.
FaceApp has a beard enhancement feature that works well for adding definition and can also try different beard styles on your face. For the specific problem of a beard looking flat or patchy in photos, the “enhance” filters combined with their beard density options do a reasonable job for a quick mobile fix. The limitation is less control than Remini or Firefly — the adjustments are more preset-based. But for a quick fix on your phone without desktop software, it’s the most accessible option and the results are generally natural enough for social media use.
If you’re a photographer shooting portraits for clients who have beards, Topaz Photo AI’s combination of face enhancement and texture recovery handles facial hair better than anything else in its class. The “Face Recovery” model reconstructs fine hair detail in beards and eyebrows with enough fidelity that the texture looks photographically real rather than AI-generated. Overkill for casual phone photo enhancement, but for professional headshots or any portrait you genuinely want to look its best, it’s the benchmark.
“It’s not your beard that looks patchy — it’s the camera flattening the texture. AI can rebuild what the camera lost.”
The Midjourney Prompts That Work for Beard Enhancement
If you’re using the reference image approach in Midjourney, the prompt language matters significantly. Here are the specific prompts I’ve tested:
Step-by-Step: Getting the Best Enhanced Beard Photo
Mistakes That Make Beard Enhancement Look Fake
The temptation is to push the enhancement to maximum — denser, sharper, more defined. But AI beard enhancement looks most natural when it’s improving what was already there, not creating something new. If the beard starts to look like it was drawn on rather than grown, you’ve gone too far. The goal is “better version of the same beard,” not “different beard entirely.”
Most beard enhancement tools handle the cheek and jaw area well but treat the mustache region inconsistently. Always check the mustache-to-beard blend separately — AI often creates a visible texture difference between the two areas that looks unnatural at close range. If the blend looks off, do a targeted Firefly fill on just the transition zone.
This should go without saying but AI-enhanced beard photos shouldn’t be used for anything that requires accurate representation — passports, ID cards, visa applications, LinkedIn profiles where you’ll meet people in person. For social media, creative use, or personal preference, it’s fine. For anything that requires accurate appearance documentation, use unedited photos.
Most beards are slightly asymmetric — one side grows slightly differently than the other. AI tools sometimes over-correct this asymmetry in trying to make the beard look “perfect,” resulting in a beard that looks symmetrical in a way human beards rarely are. A slightly asymmetric result is almost always more convincing than a perfectly symmetric one.
Some AI beard enhancement tools alter skin tone slightly as a side effect of processing — particularly Midjourney which tends to brighten and smooth skin in portrait mode. After any enhancement, check that your skin tone in the result matches your actual skin tone. If it’s been altered, either adjust the brightness/saturation in a photo editor, or use a lower –stylize value in Midjourney to reduce the effect.
What Actually Changed for My Profile Photo
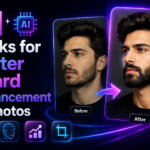
After that comment from my friend, I took a new photo with better side lighting and ran it through Remini. The difference in beard definition was immediately obvious — the AI had reconstructed the individual hair-group texture that flat frontal lighting had compressed out in the original.
I then used Firefly’s Generative Fill on two small patches on my cheek where growth is genuinely sparse — those areas had always looked noticeably thinner in photos even though they’re barely noticeable in real life. The fill blended naturally with the surrounding texture.
The final photo was still recognizably me, still looked like a photograph rather than a generated image, and the beard finally looked in photos the way it actually looks. Several people who saw the updated profile photo said “great photo” without knowing anything had been edited.
That reaction — “great photo” rather than “nice beard” or any specific comment about it — is probably the best sign that the enhancement was done right. It improved the photo without drawing attention to itself.
The lighting change — moving to side window light — made more difference than any AI tool. If you’re going to take a profile photo specifically, get the light right first. A well-lit photo with a real beard will almost always look better than an AI-enhanced flat-lit one. AI tools work best as refinement on a decent original, not as rescue operations on bad photos.
Start with Remini for natural texture enhancement on any beard photo — it’s free, fast, and handles the most common problem (flat camera compression) very well. For specific patchy areas, Adobe Firefly’s Generative Fill gives you surgical control. For a complete portrait re-generation with maximum beard definition, Midjourney with reference image mode is the most powerful option. And before any of this — fix your lighting first. A photo taken in good side light needs almost no AI help. A photo taken in flat overhead light will always need more fixing than any AI tool can perfectly solve. Both steps together is what actually gets you from “that doesn’t look like my beard” to “great photo.”